
Creating SWAP partition using FDISK & FALLOCATE commands
Creating SWAP partition using FDISK & FALLOCATE commands
Swap-partition holds the memory which is used in case the physical memory (RAM) is full . When RAM capacity has been utilized to maximum , Linux machine moves inactive pages from memory to swap-space which are then used by the system. Though it gets the work done, it should not be considered as a replacement to physical memory/RAM.
In most cases, it is advised to keep SWAP-memory equal to size of physical memory at minimum & double the size of physical memory at maximum. So if you have 8 GB RAM on your system, Swap should be between 8-16 GB.
If a swap-partition has not been configured in your Linux system, your system might start killing off the running process/applications & might cause your system to crash. In this tutorial, we will learn to add swap-partition to Linux system & we will be discussing two methods for creating swap partition
- Using fdisk command
- Using fallocate command
(Recommended Read: How to create SWAP SPACE in Linux system)
(Also Read: Useful Linux Commands that you should know)
Creating swap Using Fdisk command
Normally, first hdd of the system is named /dev/sda & partitions for it are named /dev/sda1 , /dev/sda2. For this tutorial we will using a HDD that have 2 primary partitions on system i.e. /dev/sda1, /dev/sda2 & SWAP will be /dev/sda3.
Firstly we will create a partition,
$ fdisk /dev/sda
to create a new partition type ’n’ . You will now be asked to enter the first cylinder value, just hit enter key to use default value & then you will asked to enter last cylinder value, here we will enter the size of swap partition (we will be using 1000MB). Enter the value in last cylinder as +1000M.

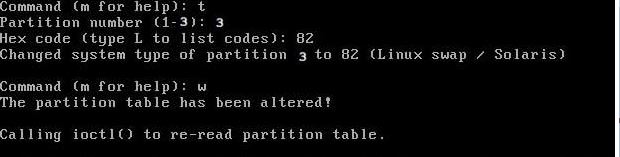
We have now created a partition of size 1000MB but we have not assigned it any partition type, so to assign a partition type, press “t” & press enter.
Now you will be first asked to enter partition number, which is 3 for our partition & then we will asked to enter partition id which for swap it’s 82 (to see list of all available partition types, press “l” ) & then press “w” to save the partition table.
Next we will format our swap partition using mkswap command
$ mkswap /dev/sda3
& will then activate our newly created swap
$ swapon /dev/sda3
But our swap will not be mounted automatically after every reboot. To mount it permanently in our system, we need to append /etc/fstab file. Open /etc/fstab file & make an entry of the following line
$ vi /etc/fstab
/dev/sda3 swap swap default 0 0
Save & close the file. Our swap now will even work after a reboot.
Creating swap using fallocate command
I prefer this method as this is easiest & fastest way to create swap. Fallocate is one of the most underestimated & very less used command. Fallocate is used to pre-allocate blocks/size to a files.
To create a swap using fallocate, we will firstly create a file named swap_space in ‘/’. Next we will allocate 2GB to our file swap_space ,
$ fallocate –l 2G /swap_space
We will then verify the size of the file by running
ls-lh /swap_space.
Next, we will make our /swap_space more secure by changing the file permissions
$ chmod 600 /swap_space
Now only root will be able to read, write on this file. We will now format the swap partition,
$ mkswap /swap_space
& then will turn on our swap
$ swapon -s
This swap partition will need to be remounted after every reboot. So to make it permanent, edit the /etc/fstab, as we did above & enter the following line
/swap_space swap swap sw 0 0
Save & exit the file. Our swap will now be permanently mounted. We can check if your swap is working or not by running “free -m” on your terminal after rebooting the system.
This completes our tutorial on how to create swap using Fallocate and fdisk command, I hope it was simple enough to understand & learn. If you are having any issues or have have any queries, please mention them in the comment box below.
