
How To Ping Specific Port Number
Pinging ports is one of the most effective troubleshooting technique in order to see if a service is alive or not.
Used by system administrators on a daily basis, the ping command, relying on the ICMP protocol, retrieves operational information about remote hosts.
However, pinging hosts is not always sufficient : you may need to ping a specific port on your server.
This specific port might be related to a database, or to an Apache web server or even to a proxy server on your network.
In this tutorial, we are going to see how you can ping a specific port using a variety of different commands.
Table of Contents
Ping Specific Port using telnet
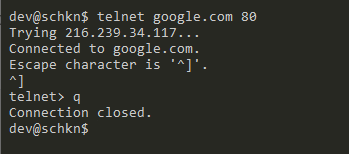
The easiest way to ping a specific port is to use the telnet command followed by the IP address and the port that you want to ping.
You can also specify a domain name instead of an IP address followed by the specific port to be pinged.
$ telnet <ip_address> <port_number>

$ telnet <domain_name> <port_number>
The “telnet” command is valid for Windows and Unix operating systems.
If you are facing the “telnet : command not found” error on your system, you will have to install telnet on your system by running the following commands.
$ sudo apt-get install telnetAs an example, let’s say that we have a website running on an Apache Web Server on the 192.168.178.2 IP address on our local network.
By default, websites are running on port 80 : this is the specific port that we are going to ping to see if our website is active.
$ telnet 192.168.178.2 80

Trying 192.168.178.2...
Connected to 192.168.178.2.
Escape character is '^]'.

$ telnet 192.168.178.2 389
Connected to 192.168.178.2.
Escape character is '^]'.
Being able to connect to your remote host simply means that your service is up and running.
In order to quit the Telnet utility, you can use the “Ctrl” + “]” keystrokes to escape and execute the “q” command to quit.
Ping Specific Port using nc
In order to ping a specific port number, execute the “nc” command with the “v” option for “verbose”, “z” for “scanning” and specify the host as well as the port to be pinged.
You can also specify a domain name instead of an IP address followed by the port that you want to ping.
$ nc -vz <host> <port_number>

$ nc -vz <domain> <port_number>
This command works for Unix systems but you can find netcat alternatives online for Windows.
If the “nc” command is not found on your system, you will need to install by running the “apt-get install” command as a sudo user.
$ sudo apt-get install netcatAs an example, let’s say that you want to ping a remote HTTP website on its port 80, you would run the following command.
$ nc -vz amazon.com 80

amazon.com [<ip_address>] 80 (http) open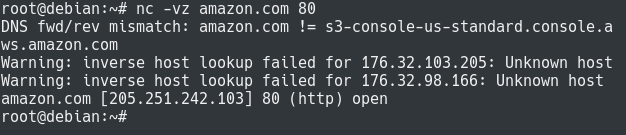
As you can see, the connection was successfully opened on port 80.
On the other hand, if you try to ping a specific port that is not open, you will get the following error message.
$ nc -vz amazon.com 389

amazon.com [<ip_address>] 389 (ldap) : Connection refused
Ping Ports using nmap
A very easy way to ping a specific port is to use the nmap command with the “-p” option for port and specify the port number as well as the hostname to be scanned.
$ nmap -p <port_number> <ip_address>

$ nmap -p <port_number> <domain_name>If the “nmap” command is not available on your host, you will have to install it.
$ sudo apt-get install nmapAs an example, let’s say that you want to ping the “192.168.178.35/24” on your local network on the default LDAP port : 389.
$ nmap -p 389 192.168.178.35/24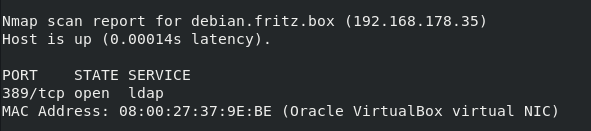
As you can see, the port 389 is said to be open on this virtual machine stating that an OpenLDAP server is running there.
Scanning port range using nmap
In order to scan a range of ports using nmap, you can execute “nmap” with the “p” option for “ports” and specify the range to be pinged.
$ nmap -p 1-100 <ip_address>

$ nmap -p 1-100 <hostname>
Again, if we try to scan a port range on the “192.168.178.35/24”, we would run the following command
$ nmap -p 1-100 192.168.178.35/24
Ping Specific Port using Powershell
If you are running a computer in a Windows environment, you can ping specific port numbers using Powershell.
This option can be very useful if you plan on including this functionality in automated scripts.
In order to ping a specific port using Powershell, you have to use the “Test-NetConnection” command followed by the IP address and the port number to be pinged.
$ Test-NetConnection <ip_address> -p <port_number>As an example, let’s say that we want to ping the “192.168.178.35/24” host on the port 389.
To achieve that, we would run the following command
$ Test-NetConnection 192.168.178.35 -p 389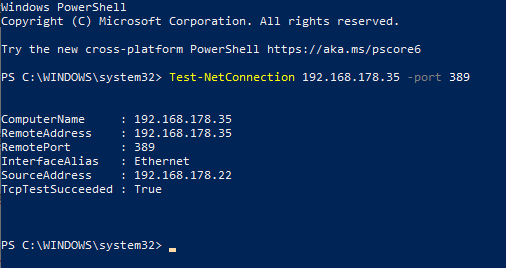
On the last line, you are able to see if the TCP call succeeded or not : in our case, it did reach the port on the 389 port.
Word on Ping Terminology
Technically, there is no such thing as “pinging” a specific port on a host.
Sending a “ping” request to a remote host means that you are using the ICMP protocol in order to check network connectivity.
ICMP is mainly used in order to diagnose network problems that would prevent you from reaching hosts.
When you are “pinging a port“, you are in reality establishing a TCP connection between your computer and a remote host on a specific port.
However, it is extremely common for engineers to state that they are “pinging a port” but in reality they are either scanning or opening TCP connections.
